
I went straight to the source to learn how to make a San Francisco sourdough, Tartine’s iconic Country Loaf. This bread has only three ingredients: flour, water and salt, and although I’ve baked a loaf a week, for the last 86 weeks, it still amazes me how something so simple can taste so good. The recipe is published on their website here, and it’s a good place to start if you don’t already have a sourdough starter (levain) going.
I actually found the first couple of steps a little confusing, and only wanted to make one loaf. So, I simplified the method for starting off, cut the recipe in half, and am sharing some steps that helped me but weren’t in the original instructions. And maybe it’s sacrilege, but I used a stand mixer. Think about it: the bakers in Tartine are using large professional mixers, so why can’t we?
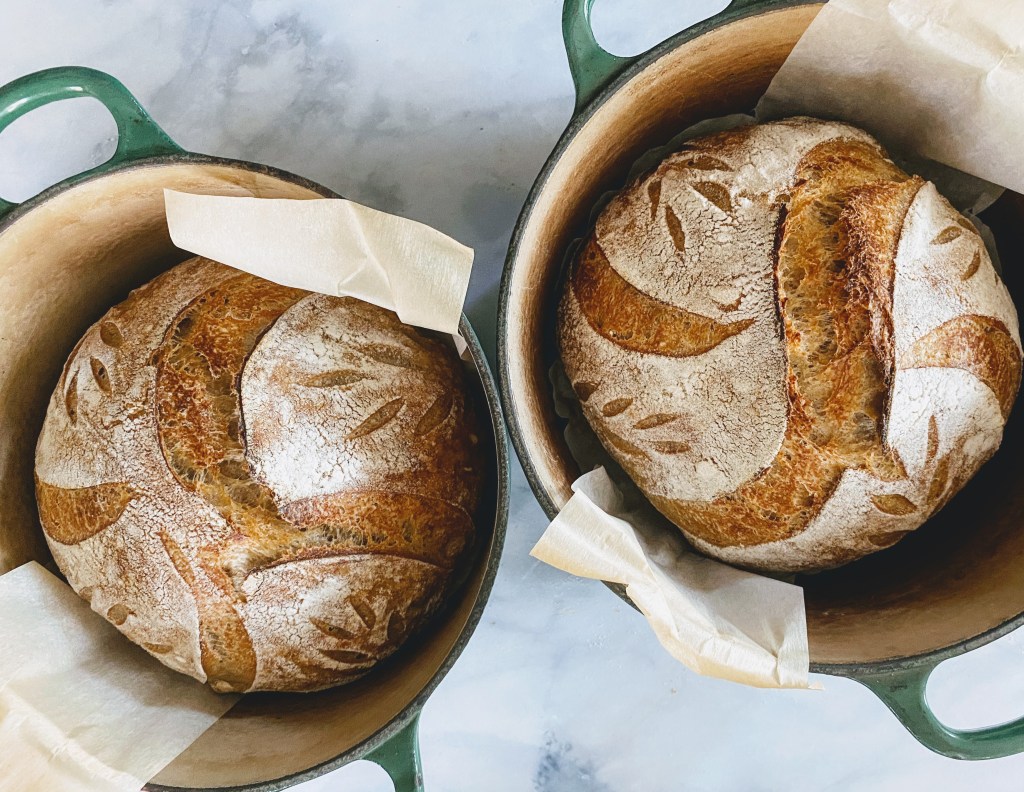
San Francisco sourdough has a unique taste that we might not be able to replicate 100% outside of the region (turns out it’s because of local bug poop, not the local bacteria), but this is a close second.
Note: Many bakers, me inclued, prefer to use a square or rectangular container for dough resting. Most people use plastic, but I find that the light plastic lifts when you lift the dough, so I’ve switched to glass. For this amount of dough, an 8 x 8 square of 9 x 13 rectangle works.
Step 1: Feed your starter so it is ripe and ready to go. I always feed mine the night before and leave it out on the counter. If it’s really warm (over 72 degrees), it could over-ripen, so it might be better to feed it first thing in the morning so that you can monitor it.
Step 2: Make dough
- 350g warm water (about 90 degrees)
- 100 grams active sourdough
- Measure water into the bowl of a stand mixer. It’s important to use warm water, which helps to achieve a nice sour taste.
- Add starter. If it floats in the water, it’s good! (If you mix your starter, so that it deflates, then it won’t float in the water. So, just spoon it out, and drop it in the water until you have 100g worth.)
- Mix with a whisk to combine well.
- 450g bread flour
- 50g whole wheat flour
- Add the flours to the water and mix on low speed (#1) for 2 minutes, scraping down sides with a rubber spatula to get the flour thoroughly incorporated.
- Lift hook out, scrape dough bits off and add them to the bowl.
- Cover with tea towel and let rest in a warm place for 45 minutes.
- Rinse the dough hook off so it’s ready for the next step.
- 10g salt
- 25g warm water
- Add the water and salt then mix on low (#1) speed for 2 minutes.
- Stop to scrape the dough off the hook and the sides of the bowl to incorporate it all.
- Up the speed to med-low (#4) and mix for 2 more minutes.
Step 3: Proofing/Kneading
- Add a little oil to your container, enough to cover the bottom so the dough doesn’t stick.
- Empty the dough into the container, scraping sides of the bowl to get it all.
The dough is going to rest/proof for 2 hours while you peridically give it a few stretches to strengthen the gluten. See Tip #3: Kneading while Proofing on the Video page for tips on the stretch and fold method of kneading.
- Cover and rest for 30 minutes, then do a round of stretch and folds. You could do coil folds if you prefer, or 2 stretch and folds and 2 coil folds. I’m not very good at those.
- Repeat this step 3 more times, for a total of 4 stretches and four 30-minute rests (2 hours resting time).
- Cover and rest for 1 hour. It should be nice and swollen by the time it’s ready to shape.
Step 4: Shaping
- Dust coutertop with flour.
- Tip the container over to release the dough onto the floured countertop.
- Shape (see video instruction below)
- Lift the side closest to you, the bottom, and stretch it out and up, then fold it over on the dough.
- Do the same with the right and left sides, pulling them out, then folding over onto the dough.
- Then pull the top side up and out, and fold it down ontopof the ther folds.
- Do a few “bakers stitching” down the middle.
- Starting from the top, roll dough down to the end.
- Leave as is for a batard, or shape into a boule.
- Flip
- Cup hands around dough and slide on countertop to make the surface even tighter.
- Place in a flour lined bannetton, seam side up.
- Cover and let proof in refridgerator overnight.
- Rice flour
Step 5: Bake (next day)
- About 30 minutes before baking, place a Dutch oven with lid (or any heat-proof container) in the oven and heat it to 500 degrees.
- Once heated, remove dough from fridge, and cover with a parchment paper sling, then invert.
- Lift basket off of the dough.
- Dust tops with rice flour (stays white) and score with a sharp knife/razor blade.
- Remove hot container from oven, and place dough inside. Cover, then place in oven and reduce temperature to 450 degrees.
- Bake 20 minutes, then remove lid and bake for 20 more.
- Remove from pot then place in turned off oven to cool with the door open.
Below is a video of Chad Robertson, owner of Tartine Bakery in San Francisco, giving a class in Denmark. A little sourdough porn for ya.
